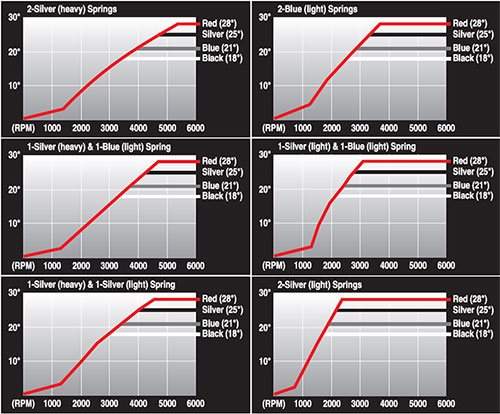
The tricky thing about ignition timing is that one setting is just not ideal for the variety of different conditions an engine goes through. When it comes to achieving optimum torque and horsepower throughout the entire RPM range, the ignition timing curve is imperative. The timing that you need during cranking and at an idle is not sufficient for high-RPM operation. Conversely, ideal high-RPM timing is not going to go over well during cranking or low speed operation. As RPM increases, the engine requires different ignition timing due to a list of changes that occur to the air/fuel mixture entering the cylinder. The main reason is the reduction in time that the mixture has to completely combust before the piston reaches top dead center (TDC) due to its increased speed.
These statistics all need to be considered when you're looking for the optimum timing setting for your application. Many engine shops or manufacturers will be able to point you in the right direction when setting the timing. Testing and tuning are the best tools you can use:
| Factor |
Advance Timing for: |
Retard Timing for: |
| Cylinder Pressure |
Low |
High |
| Vacuum |
High |
Low |
| Energy of Ignition |
Low |
High |
| Fuel Octane |
High |
Low |
| Mixture (Air/Fuel) |
Rich |
Lean |
| Temperature |
Cool |
Hot |
| Combustion Chamber Shape |
Open |
Compact |
| Spark Plug Location |
Offset |
Center |
| Combustion Turbulence |
Low |
High |
| Load |
Light |
Heavy |
MSD does not have a module to replace the breaker points system in your stock distributor, however an MSD Ignition Control will work great with a points trigger ignition. In fact, if you replace the points when you install your MSD, you’ll probably won’t have to replace or adjust them for years!
The MSD’s trigger wire connects directly to the breaker points wire so when the points open, the MSD is triggered. Since the MSD’s capacitor is responsible for sending the spark energy to the coil, the points are only used as a trigger reference signal. With this connection there is very little current crossing the points so the wear is nominal at best. Also, the MSD controls the dwell so the adjustment of the points is not that critical either. This setup works great with street cars and budget racers, but when you begin stepping up performance more and more, the need for a quality distributor comes into play.
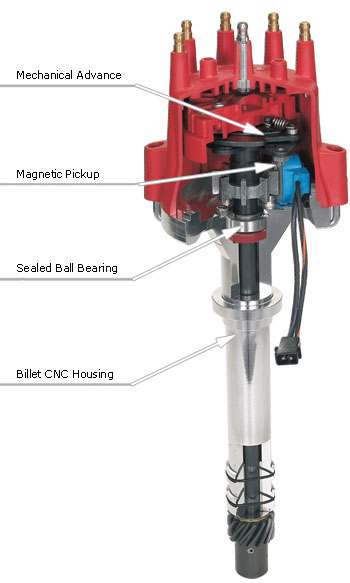
MSD’s Pro-Billet Distributors are engineered to deliver precise trigger signals, provide accurate distribution of the sparks and are reliable. A magnetic pickup is used to trigger the ignition. Unlike points, this pickup is maintenance-free and is capable of accurate trigger signals throughout 10,000 rpm.
The spark plug is the point in the ignition system where electrical energy is converted into heat, consequently, the larger the gap the greater the amount of heat available to light the air/fuel mixture. However, too large of gap combined with increased cylinder pressures can put excessive pressures on the initial voltage needed to ionize (cross) the gap. Finding the optimum plug gap for your application is best determined by experimentation because there are so many engine variables to consider.
An MSD Ignition Control has enough output power to consistently fire wider spark plug gaps on a performance engine. As a starting point, follow the engine builder or manufacturer’s recommendation for the plug gap. With that, you can experiment with increasing the gap until the best performance is found.
As a rule of thumb, it is recommended to increase the plug gap by .005” - .010” followed by testing and tuning. Keep in mind that larger spark plug gaps also place increasing demands on the secondary portion of the ignition system including the distributor cap and rotor, coil wire, and spark plug wires. They should all be in top condition and checked periodically during the race season. Remember that electricity takes the path of least resistance to a ground so if the gap is too large the spark may short to another point with less resistance.
The biggest difference is that the majority of stock ignitions are inductive ignitions. Inductive ignition systems are used due to their simplicity and inexpensive production. For stock applications these ignitions are adequate, but when it comes to gaining performance, factory inductive ignitions fall short.
The primary weak link of a stock ignition is because the coil serves double duty. The coil must act as a step-up transformer to create a higher voltage spark, plus it needs to store this power until the ignition is triggered. As engine rpm increases there isn’t enough time to completely step-up the voltage before the ignition is triggered resulting in a weaker spark. This low voltage spark may not be enough to light the fuel mixture in the cylinder which will result in a misfire and loss of power.
A CD ignition, like an MSD 6 Series, is capable of producing full power sparks throughout the entire rpm range. It draws its energy directly from the battery where a custom wound transformer steps it up to over 460 volts. This voltage is then stored in a capacitor until the ignition is triggered. At this point, all of the voltage is dumped into the coil where it is transformed into even more voltage, anywhere from 30,000 - 45,000 volts depending on the coil, which is sent to the distributor and finally to the plugs.
The ability to produce high power sparks throughout the entire rpm range of your engine is why you need a CD ignition. The payoff is complete combustion of the fuel mixture which results in more power, increased throttle response, a smooth idle, quick starts, improved economy and reduced plug fouling.
All engines will benefit from a CD ignition but when you’re planning on engine modifications, the need for an MSD Ignition increases. In particular, if you’re planning these types of engine modifications, you should be installing a CD ignition:
- Improving air flow into the engine or richening the fuel mixture (rejetting or larger injectors)
- Adding a super/turbocharger or a nitrous oxide system
- Increasing the compression ratio and consistent high rpm operation
Conventional CD ignitions supply one spark of intense energy but for a short duration (time). An MSD uses multiple sparking technology to take advantage of the quick rise time and power of a CD Ignition by producing a series of sparks. More sparks equal more heat in the combustion chamber resulting in complete combustion of the fuel mixture which produces more power. At lower rpm, there are many benefits to multiple sparks including a smooth idle, improved throttle response plus the spark series prevents fouling plugs or fuel loading up in the cylinder when air/fuel distribution is poor.
The multiple spark series of an MSD Ignition Control lasts for 20° of crankshaft rotation. At lower rpm, 1,000 rpm for example, there is plenty of time to fire the plug a number of times to ensure ignition of the fuel mixture. As rpm increases, the piston travels up on the compression stroke faster resulting in a shorter amount of time available to fire the plug so the number of sparks that occur decreases. By about 3,000-3,300 rpm, there is only enough time to fire the plug once. From about this rpm range on, an MSD ignition control delivers one intense, full power spark.
The battery is the fuel tank for the ignition system (magnetos excluded). When it’s empty there is no electrical power available for the ignition system to convert into heat at the plug gap. In long duration racing events such as circle track racing, an alternator is highly recommended. In drag racing, a charging system is not a complete necessity as long as you have a good battery and charge it in between each round. Also keep in mind that electric fuel and water pumps, fans and solenoids eat up a lot of current as well.
Race cars without charging systems must have a battery with a large enough capacity to power all the electrical parts. For example, an MSD 6 or 7 series ignition consumes approximately one amp per thousand rpm, so at 5,000 rpm the MSD alone is using five amps. An MSD is designed to produce full power sparks with a supply voltage of 10 volts, but if the supply drops below that, ignition output will suffer.
An MSD can be used with 16 volt batteries, but no performance gain will occur because the output power of the MSD is regulated. The advantage of a 16 volt battery is increased electrical capacity. For more information on battery requirements with an MSD, ask your MSD Customer Support Tech for our Battery Tech Bulletin.
- A high rpm miss when the engine is under load?
- An rpm limiter that seems to activate at the wrong rpm?
- Erratic operation of electronic devices/ECUs?
- A tachometer needle that seems to “bounce”?
All of the above can be caused by Electro Magnetic Interference (EMI) generated by the ignition system. Specifically through the coil and spark plug wires. The ignition system is a miniature power station and the spark plug wires are its transmission lines. The wires (in particular, “solid core” wires) can broadcast EMI that seeps into electronics and causes erratic behavior.
To combat EMI you need to run a set of helically wound spark plug wires such as MSD’s Heli-Core or 8.5mm Super Conductor Wires. Having the conductor wound around a special center core produces a “choke” that holds EMI inside the wire. Solid core wires on the other hand, have no suppression capabilities and should not be used with an MSD Ignition. MSD’s Super Conductor Wires have extremely low resistance (less than 50 ohms per foot), yet are designed to suppress EMI like a high resistance wire.
Other steps to avoid EMI problems include routing your coil’s primary wires away from other plug wires. The magnetic pickup harness coming from the distributor or crank trigger should be routed away from other wires and is a good idea to have it mounted along a metal surface that will act as a ground plain. MSD also offers a six feet long shielded mag pickup cable, PN 8862, that can be used if you are having problems with EMI interfering with other electronics on your vehicle.


 Get help from other Gear Heads!


